Users
Download Green PDF Printing files A .deb package for debian-based systems is available. Also available is a zip file for win32 systems with instructions inside on how to download and install dependencies.
Join this project:
To join this project, please contact the project administrators of this project, as shown on the project summary page.
Get the source code:
This is a python-based project, so source code is automatically included in the project bundles in downloads
Project Information
About this project:
This is the Green PDF Printing project ("green-printing")
This program supports some elementary PDF manipulation, and is intended mainly for saving printer paper (and hence trees!) when printing. This application helps n-up-ing pages by providing auto-crop and fine-tune cropping in a GUI to enlarge readable part of pages. N-up'ing is where multiple logical pages are shrunk and printed in one physical page.
The tool also deduces the local printers available in the system and their printable regions for each paper size. It then compensates for these printable regions.
Its main capabilities are:
- Supports printing to system printers taking their printable areas into account.
- Prints pages in "N-up" mode.
- Presents an interface to crop pages.
- Can infer an "auto-crop" region for pdf pages.
- Create and save output files with all of the above properties.
It was created to support use cases of the following kind:
- Simple: Choose an input file from disk, crop pages as desired, and directly generate an output file from this input file. Ask for '2x1' n-up printing. Additionally, ask for page numbers to be inserted such that when pages are printed back-to-back and stapled along the longer-edge, the page numbers always appear at the farther end of the seam.
- Two files: Choose (or more) two input files from disk. Crop the readable space as desired. Create a new output file. Paste pages from both files onto this output file. Ask for 2x1 nup. The tool should insert blank pages in between to ensure printing keeps the two files in distinct physical pages. Generate output. This case is useful when using network printers in organizations; typically, network printers always insert an extra header page to differentiate print jobs from multiple users. This way, we can save on some of the header pages.
- Slides presentation: Take a pdf presentation. Choose some important slides. Optionally, add blank pages after some slides for notes. Print out in "notes" format: layout should switch to 1x2 if slides in landscape orientation.
The exact license terms used by this project on the project summary page and in the licensing documents included in the downloads.
How To Use:
Perhaps the best way to learn the tool is to get our hands dirty with using it. I'll use the three use-cases listed above and go through using the tool to address each. First, let's look at the important screens. I've numbered all the key elements, and will use them later to explain their usage.

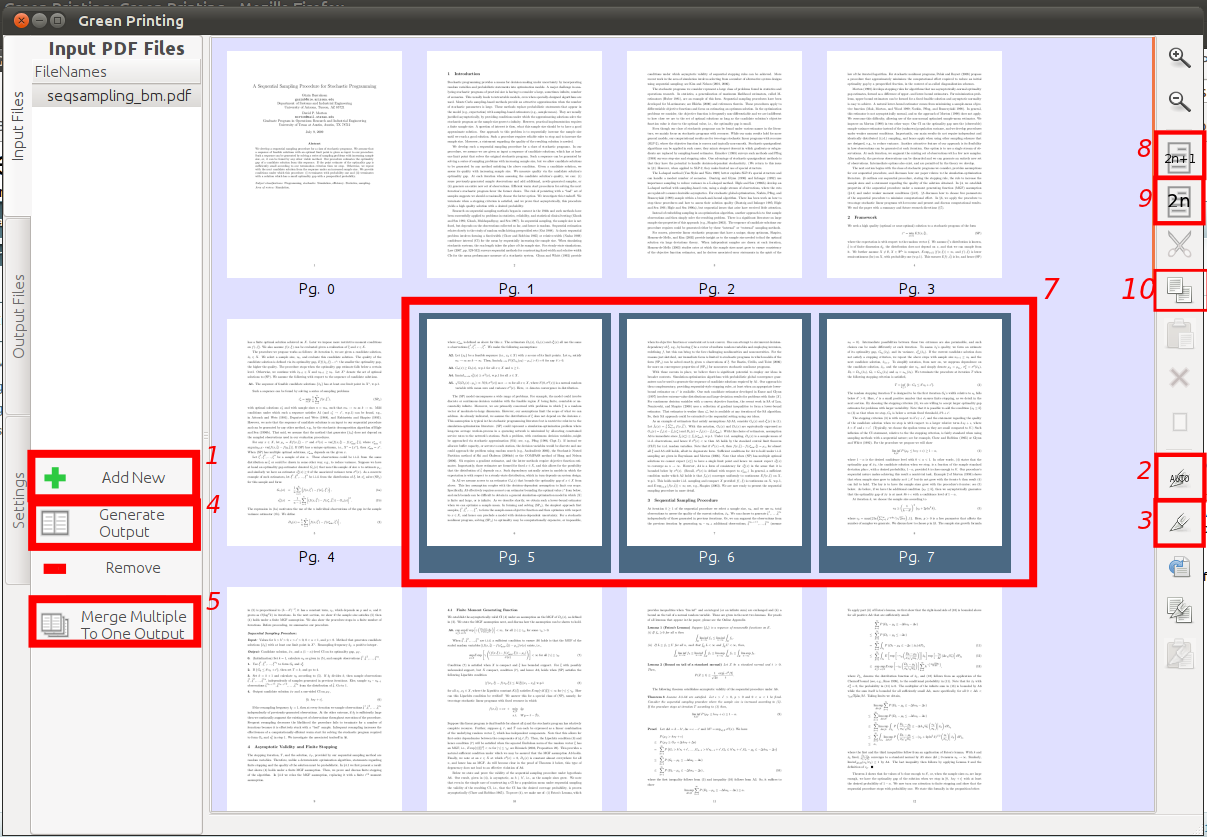
1. Input Pages

2. Crop Window

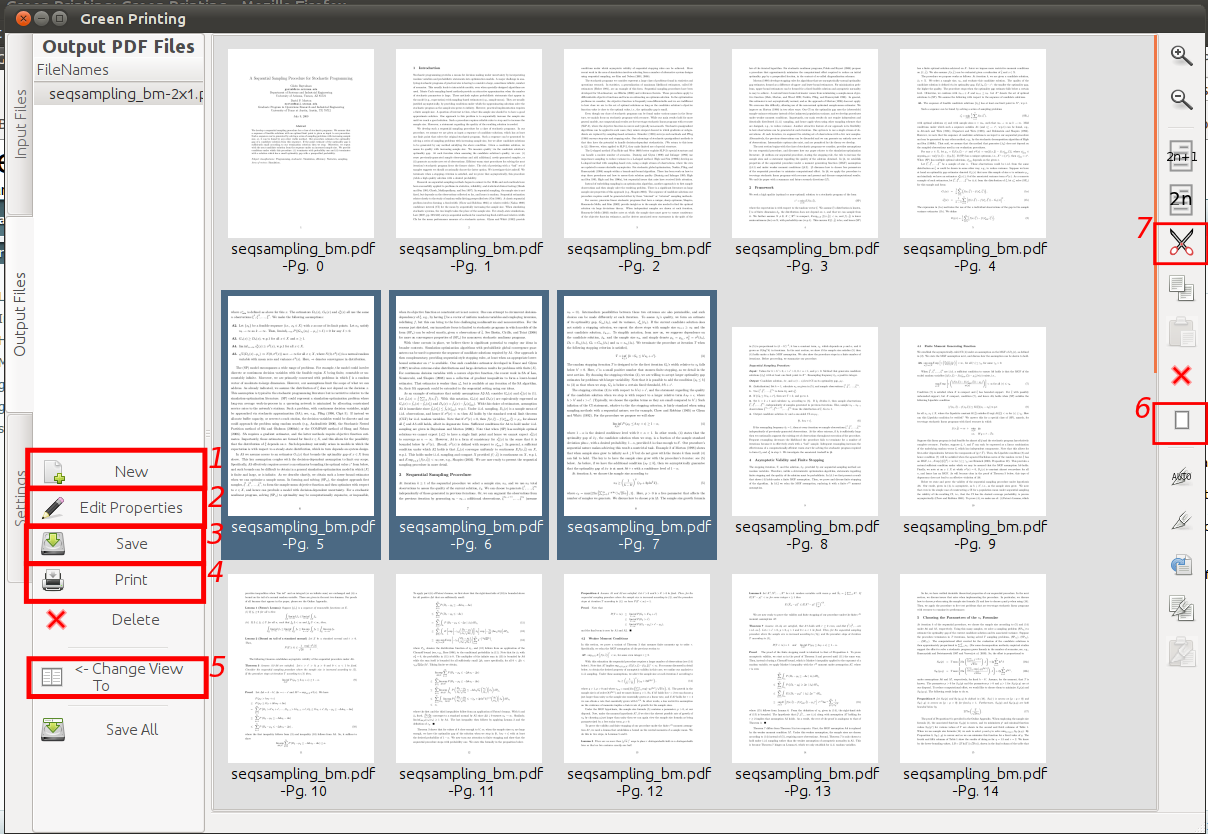
3. Output's Input View

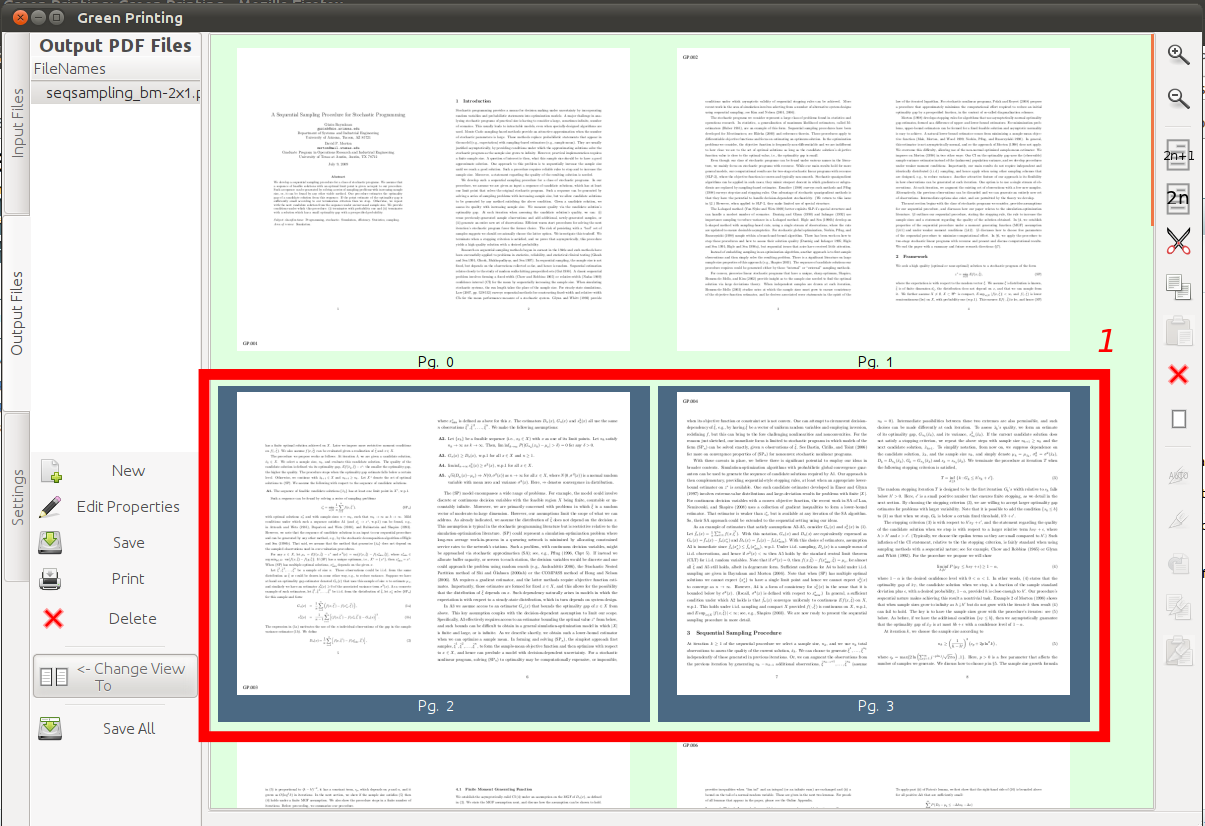
4. Output View

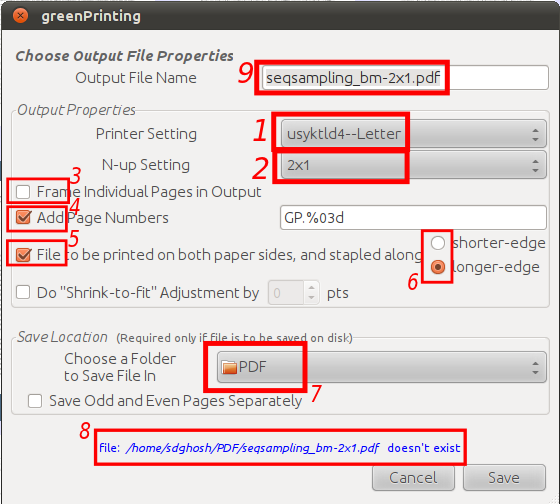
5. Choose Output
The main UI has three tabs that appear in vertical orientation at the left side of the main window: "Input Pages", "Output Pages" and "Settings". Each switches to a specific view. Let us now tackle each use-case in turn. The notation [p:n] implies a reference to the high-lighted widget (button/scrollbar/window etc.) n in the UI image p above.
-
Simple:
- Choose an input file from disk by clicking on [1:1] and following the standard OS-specific file-browser selection procedure. Note that multiple files can be selected.
- Crop pages as desired: there is an auto-crop option provided (click on [1:2]) and follow a simple dialog. Alternately, or after auto-crop-selection, click on [1:3] to fine-tune the crop selection using the crop dialog [2]. Both the auto-crop and crop dialogs let the user choose to constrain the crop rectangle to certain Aspect-ratios ([2:1]). The most important such option is the aspect-ratio implied by a selection of printer and printer page size and desired output N-up. (Refer settings to see how to set up your system's local printers in the tool.) Cropping UI is straightforward: a "resize" mouse-icon shows up when the pointer is in the blue-rectangle [2:2] and allows the user to resize the crop window. The crop window can be moved by clicking and holding down the left-mouse button on the crop window.
- Cropping is always applied to currently selected pages [1:7]. Some convenience options are provided to make selections easier: [1:8] selects all odd-numbered pages and [1:9] selects all the even-numbered pages. This can be important for pdf files that are printed in "two-sided book" format, where each page leaves extra margin on the "binding" side.
- Generate an output file: Click on [1:4] from the input file view. This presents you with dialog [5], which allows you to choose many options for your output. Choose: [5:1] printer/page size to be used in printing,[5:2] n-up option in printing (allowed options are : '2x1','1x1','2x2' -- choose '2x1'), [5:3] print a thin frame around each logical page, [5:4]ask for page numbers to be inserted such that when pages are printed back-to-back[5:5] and stapled along the [5:6] longer-edge / shorter-edge, the page numbers always appear at the farther end of the seam. This dialog also indicates, at the bottom [5:8] above the save/cancel buttons, whether a file with the chosen [5:9] file name alraedy exists at the chosen [5:7] save-location. The choices made here can be edited later on by clicking on [3:2].
- Clicking on "Save" then automatically switches us to the "Output File" view, where the input pages to this output file are displayed [3]. The input pages are automatically copied over from the input file.
- To see the output-pages view, click on [3:5]. Be patient, as system calls to pdflatex can take a while. If all goes by plan, one should see the output-pages view [4], which should display '2x1' output as chosen. Notice how cropping the three highlighted pages [1:7] makes them display larger than the other pages in the output view [4:1].
- If you desire to change some output detail, click on [3:2]. This should re-generate the output pages if currently in output-pages view, else waits till the output pages are needed.
- To save the file to chosen save-location, click on [3:3].
- To send to the printer of your choice, click on [3:4]. Note that this option has not been implemented for win32 platform.
-
Two files:
- Choose (or more) two input files from disk by starting from [1:1].
- Crop the readable space of each file as indicated in the earlier use-case.
- TO create a new output file that combines all the files, click on [1:5]. The displayed dialog is the same as [5], with one addition: a list of input files from which you can choose multiple files as input to this new output file being created.
- On clicking "Save", the tool will take you to the "Output File" page with the corresponding input pages view[3]. You'll notice that the tool has inserted blank pages in between files to ensure printing keeps the two files in distinct physical pages, thus allowing each to be used independently of the others.
- Generate output as indicated above.
-
Slides presentation:
- Select pdf presentation file.
- Make a selection of pages that should have a blank page after them.
- This use-case introduces another important button on the RHS toolbar: [3:6]. Clicking this when one or more pages are currently selected makes the tool insert a blank page after each selection using each page as a template. If clicked when no selection is active, a blank page is inserted at the end. One can of course compose the order of the pages in the file in any order desired by dragging the page icons around.
- Copy the pages desired in the output by clicking on [1:10]. (Note that cutting pages from current view is only allowed in the Output pages views [3:7].)
- Navigate to the "Output file" view. Click on [3:1] to create a new empty output file. You will be presented with the same (by now familiar) output properties dialog.
- Output as before. Note that in this case, if '2x1' output is chosen, the tool automatically shifts to '1x2' layout to accomodate slides in landscape layout.
Settings:
A final word on managing settings on the tool: selecting the "Settings" tab takes you to the view in [6] here. Lots of settings to look after in [6:1], but the most important ones are "Printer Page"[6:2] and "Tex"[6:3].The latter provides a folder-selection dialog which can be used to point to the "bin" directory of the LaTeX distribution being used. In the normal course of things, this location should be auto-detected by the tool, but in special cases such as custom-installations, this may not work well.
The "Printer Page" settings window presents a bunch of option to manage information about the local printers installed in the system. Note that these need not be physically local to the system, i.e. attached to the same computer, but needs to be installed on the system for local spooling access. For example, under linux, all printers installed by CUPS - be it local of network printers - are available to us. Similarly, under win32, all locally installed pritners are at our disposal. These are the various scenarios supported by this interface:
- Add a new system printer and page combination: Click on "Query for information on connected printers" [6:4] and the tool will ask the OS to provide all relevant printer information. This may take a while with some network printers, especially if are not online in the current network. Once all printers have been queried, the printer and page combo-boxes in [6:6] are populated. Choose the combination of interest and the relevant info is displayed in [6:10]. You can edit many of these, e.g. printable area as reported by the pritner's drivers, or, importantly, "set as default" [6:11]. Once satisfied with settings, you can elect to save this combination for future use by clicking [6:7]. As you may have guessed by now, you will have to select every printer-page combo individually and save them, e.g. "Postscript-Letter", "Postscript-Legal" etc.
- Edit a printer-page combination: Select a printer-page combination you'd like to edit from the drop-down box [6:5]. Note that this box will not be activated if you are still in the "Add new printer page combo" mode above; to get out of that mode, click on [6:8], and you'll see that the "Define new..." frame has been greyed-out. The chosen printer-page combination's information will be presented in [6:10]. Once you've edited to your satisfaction, remember to click on "save edits" [6:9] or else no changes will be saved.
©Copyright 1999-2009 - Geeknet, Inc., All Rights Reserved


